Tuesday, September 24, 2013

WTF? THE HOUSE IS SHRINKING!

Howdy Y'all!


I'm sitting here, all alone, enjoying a wonderful glass of wine and cigar on a beautiful Texas evening while Jan is in Seattle partying hard with Macenzie [sic], trying hard to figure out how the house got smaller in the space of a single day!
Really good!
Well, as it turns out, they started "rockin' the house" today (builder-speak for putting up sheetrock) and all of the rooms started getting freakin' smaller! We know that it is an illusion, but they do look smaller (except Jan's closet). There is still some work that the insulation guys need to complete, so the sheet-rockers are working around the walls that need to be further insulated and finished. Hopefully, it won't shrink any further.
Like all of the rest of the processes, we're fascinated by the way they deal with rounded walls. As it turns out, on some walls they take 1/4 inch sheetrock and form it around the bends. Then they layer a second 1/4 inch sheet right over it to achieve the 1/2 inch thickness. This is the process they will use in tight radiuses like Jan's powder room.
The other high tech approach is to go out to the hose, spray the back side of the sheetrock with water, and form it around the bend while it is still wet. It dries, and presto!, instant curved wall! That is the process they used for this wall in the following picture.
Something that we learned from the Alan the Great in Walla Walla was screwing sheetrock in, rather than nailing. Nails eventually, over time, work their way out; screws don't. Takes longer, but worth the effort. (Okay, not my effort, but you get the point.)
Exercise Room - Curved back wall. 
Media Room
Jan's closet (getting bigger, not smaller).
Wine Room. Hurry!
Almost finished garage.
We're now at the point where the interior activity is no longer dependent on the exterior stuff, and vice versa, which means that we should see texture on the interior walls within a week. The outside activity is slower going, although the stucco facing is complete and is being painted as I write this.
If you remember from the previous blog update, the stucco team put up a 'scratch coat' (grey stuff) as the first step. They then applied a white 'finish' coat which represents the finished texture (ala "Tuscan" in our case), and has a water sealant in the product. They then primer the finish coat and apply two coats of elastomeric paint ("Latte" color). The elastomeric paint also has a water sealant in it, and can expand and contract with the weather. (See how this all comes together?) Now, all that remains, once the stucco painting is complete and all of the fascia and soffits have been painted, is 'waiting in line' (more builder-speak) for the stone masons and roofers to show up.
Primer coat over the finished texture.

Primer coat and first Latte color coat on Guest Rooms.
Workin' the roller on the inside driveway arch.
Finished driveway arch. 
Finished arch - inside view.
The big surprise when I stopped by the site today was the installation of the front doors. To be honest, we would have preferred that they waited, but the builder informed me that because of the iron door frame, they need to be installed so that the masons can set stone around the outside frame. This makes the door frames virtually impregnable (yes, our big word for today!), and allows the sheetrockers to properly finish the inside frame. This picture is kind of funky looking, but it is the reflection off of the wrapped plastic around the doors.

Front entry doors.
But Wait, There's More!
For those of you that have wondered if we are putting a pool in, here is the final plan (we hope) that we have been working on for the last 3-4 weeks. It still has some work left, and although this is not the detailed drawing, it is very close to what it should look like. Of course, this assumes a lot of landscaping that doesn't quite work in a ranch setting, but we'll eventually get to that part. (We need a money tree, not palms!)
Pool Plan, minus all of the lawn shown here.
That's all for now.
See ya later!
- John and Jan - 

Monday, September 16, 2013

FOAM IN MY COFFEE

Howdy Y'all!

Here we are at the start of another week of 'little' things getting done. The good news is that we are starting to see a separation of inside and outside build progress, where one isn't dependent on the other. There are some cool activities where we have learned a bit more about the building process in Texas. Makes us want to start another house and use all of this newfound knowledge - JUST KIDDING! :-)

Probably the most amazing process so far is the insulation foam process (yeah, really!) to the interior of the house. We elected to use two different insulation products (get that pen and pencil out now). 
For the exterior walls of the house we chose an insulation product that is an 'open cell' foam spray; at about R3.5 per inch, with roughly 5-51/2 inches of foam, we should experience an insulation factor of about R19 in the walls. The 'open cell' structure of this foam is filled with air, which seals the walls for the lifetime of the structure and makes for a healthier and more energy-efficient. For the ceilings, the wine room, and the media room, we chose a 'closed cell' foam insulation with an effective value of about R7 per inch, or about R38 in the ceilings. The closed cell foam uses an inert gas instead of air, and is essentially denser per square foot. Using this type of foam insulation in the wine room will give us humidity control, which we felt was important, and in the media room provides a better sound deadening insulation for noise and vibration. The amazing thing is the temperature difference in the house since they started the installation process. I'm told that the attics will only reach about 80 degrees regardless of how hot the temperature is outside. This makes a huge difference in air conditioning costs during the hotter part of the year, and less heating expense (can you say propane?) when it does get chillier here.

I spent the better part of a fascinating morning watching the insulation process, unbeknownst that the little spray particles had completely covered my sunglasses (on my head), and layered my coffee cup. Not sure how much I actually ingested, but there haven't been any complications yet. (It doesn't take much to keep me entertained in my old age these days.) 
Watch the following sequence closely; it goes from spray to foam in about 3 seconds. Very cool! Just make sure you take pictures of every wall, and where all of the wires and plumbing are located 'cause you don't see them anymore.

Pic #1 - Spraying the liquid on the wood.
Pic #2 - Starting to 'foam'.
Pic #3 - Viola! Instant foam insulation. Feels like Styrofoam.
Pic #4 - Finished product.

Pic #5 - Shaving the walls in the Powder Room.
Working our outside, our trusty painters are still staining the soffits and corbels. Unfortunately, because of the location, this is all handwork instead of just using a spray gun. In retrospect, we should have designed something easier to stain. Hopefully, they will be finished sometime in this decade.
Omar and Abdul staining away.
As is always the case, there are "oops" along the way. Here we have a pallet of roof tiles that didn't quite make it to the roof. Thankfully we only pay for what we use in product,so someone else will eat this mishap.
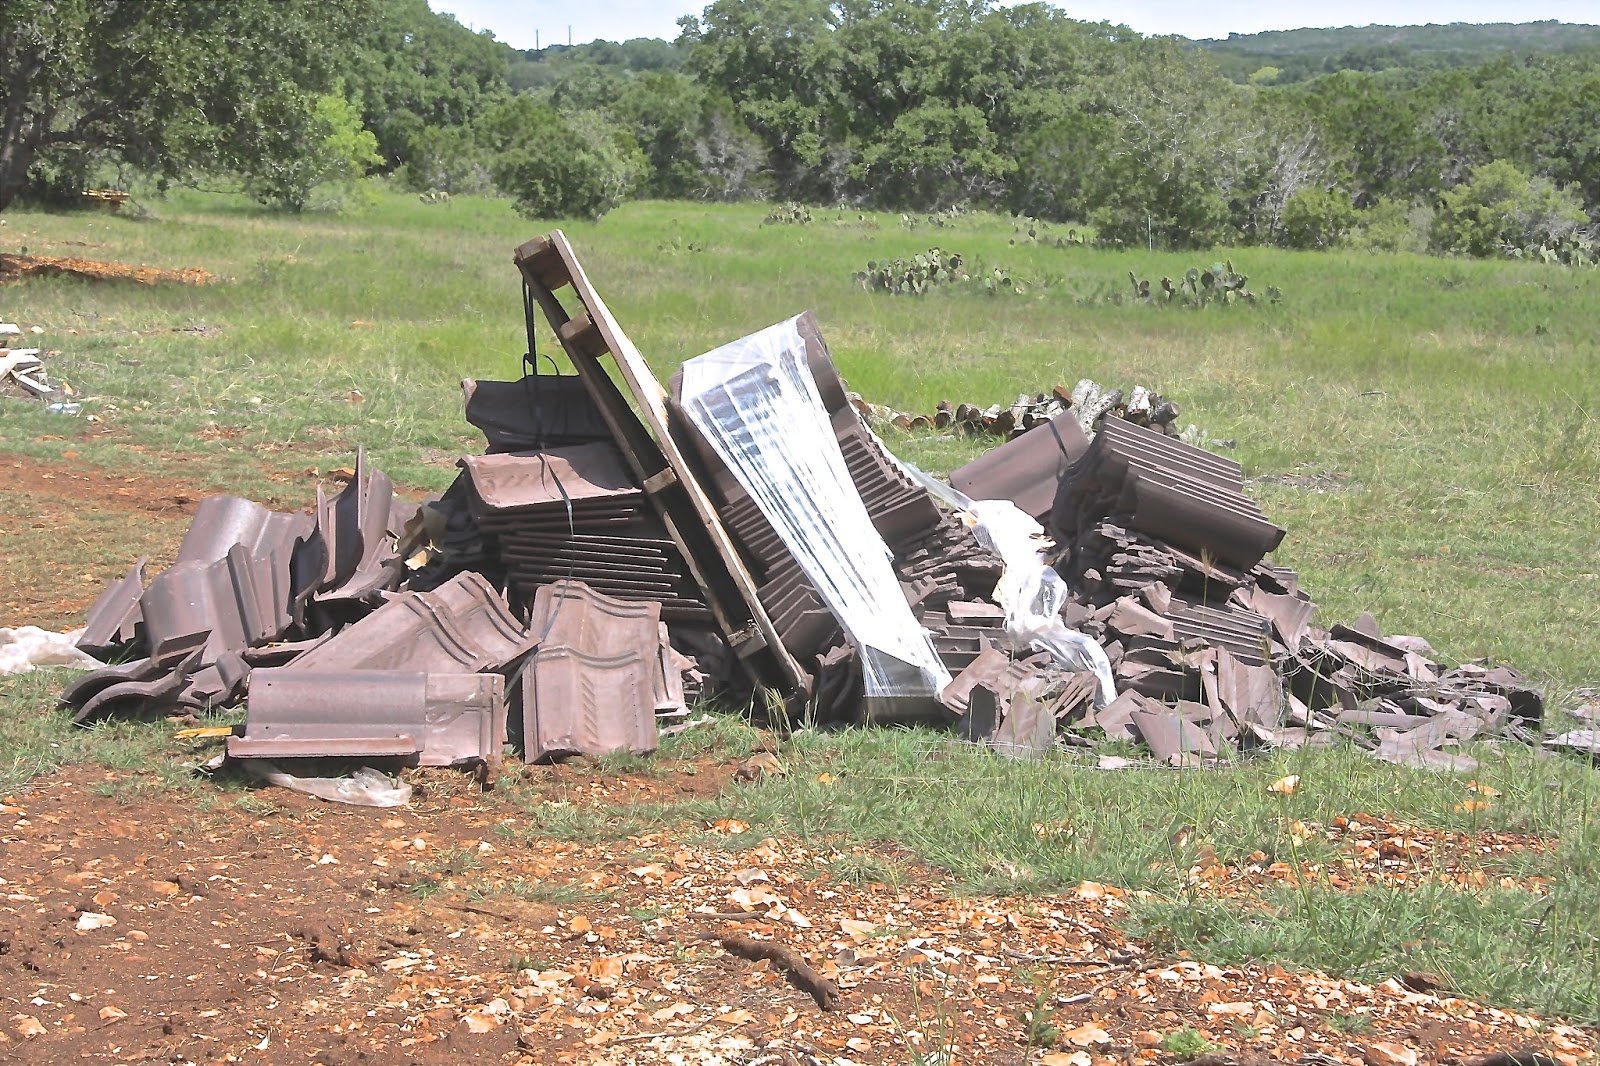
Someone needs fork lift driver education.
I always have to admire the resourcefulness of the crews that arrive on site to work. I have searched the Internet high and low to find the cool tools that these guys invent along the way. Here is a great example of a 'must have' ladder that belongs in every garage.
A real Tool Time product.
Each site has the inevitable pile of scrap that has to be removed, and ours is no exception. Lots of small lumber and stuff that needs to be carted off to the dump.
As the guys were loading the excess lumber scraps, they ran across a little visiter who probably was looking for something to eat in the pile, i.e. scorpions, small field mice, little lizards, etc. that like to hide in wood piles here. The good news is this looks like a Texas Rat Snake and is non-poisonous.
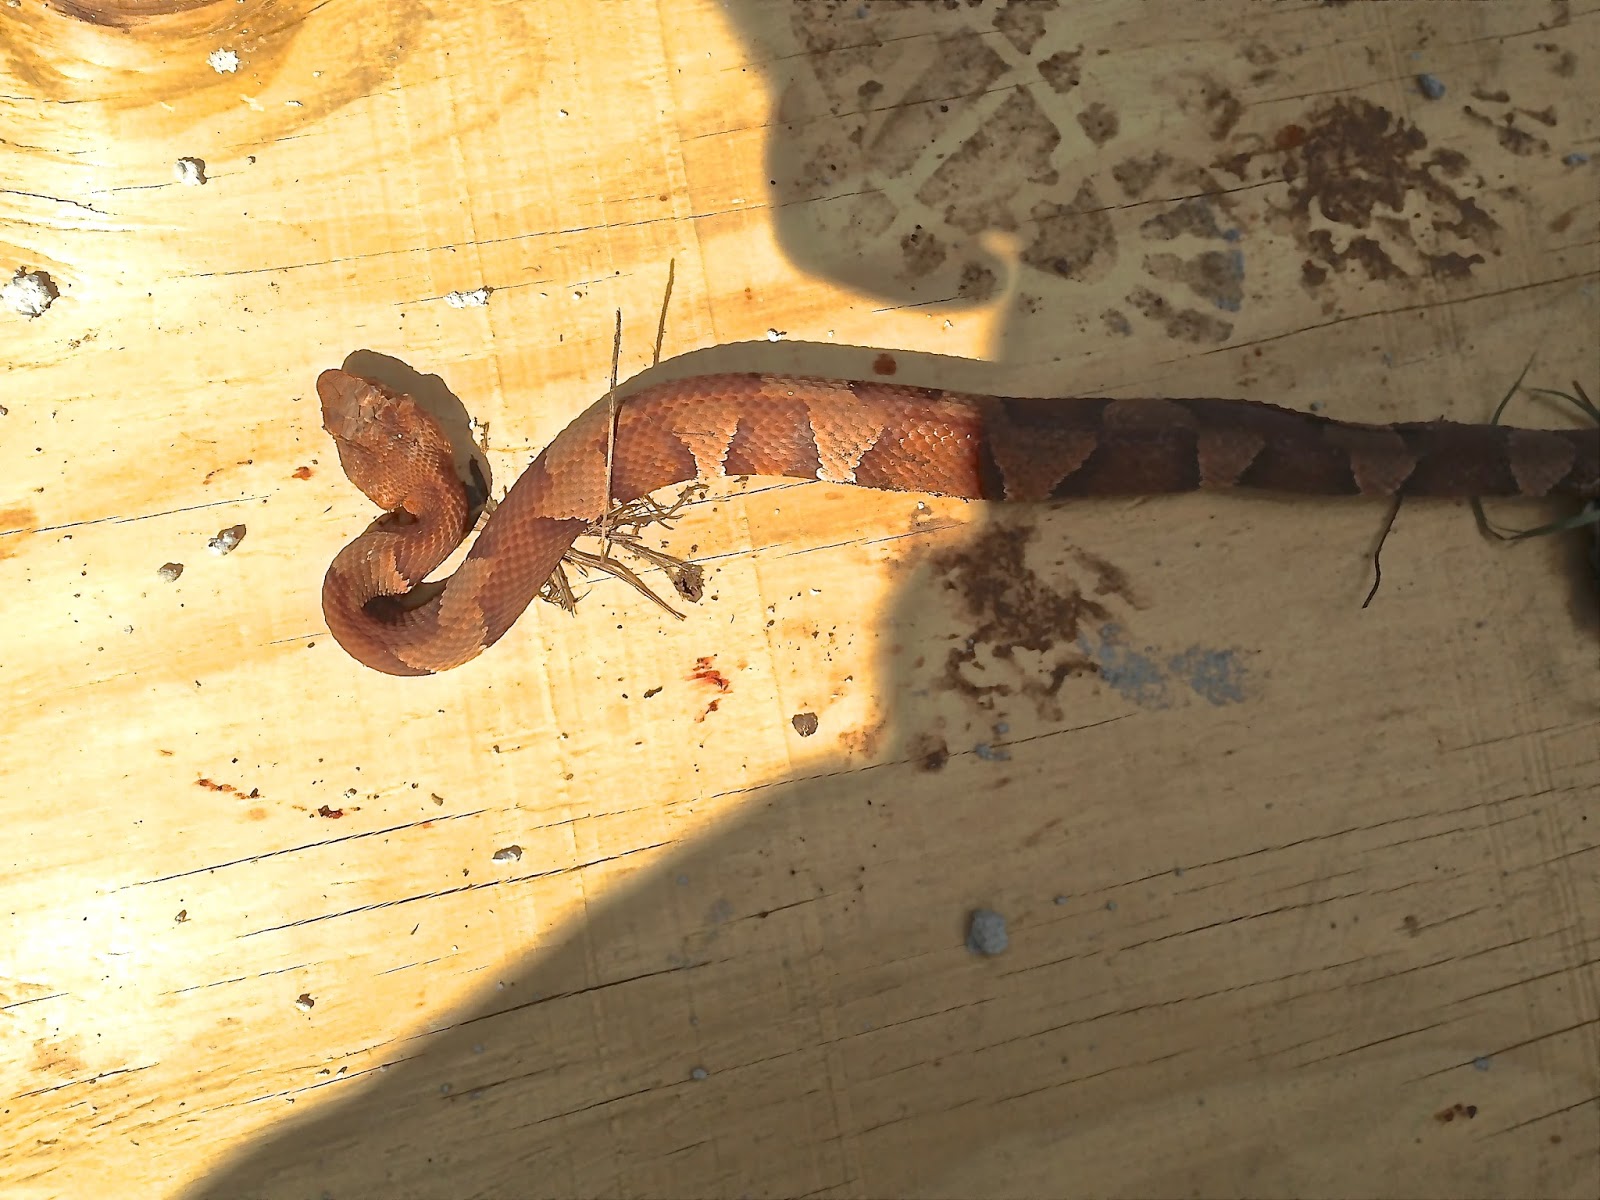
Cute little fella!
That's all for now.
See ya later.
- John and Jan - 

Tuesday, September 10, 2013

LOTS OF TIDBITS

Howdy Y'all!

Did ya miss us??

Its been a busy time since our last post on August 21st, including escaping the Texas heat for a week to attend our niece's wedding in So. Calif. (more on that later). Building activity at the ranch has been an assortment of little things, which you'll see in the score of pictures we've taken. Think of the last two weeks as a 'time lapse' camera, and you'll see the difference in progress unfolding.

When we last left you there was a lot of indoor framing, electrical work, plumbing, etc. Well, most of that was completed, and work started on the exterior, so let's bring you up to speed with some pics of the interior progress.

Here we have the return of El Gato scaling the heights of the Great Room. [Notice the OSHA approved scaffolding and safety lines. :-(] They are putting up the 'nailers' that will eventually support the cedar beams that will run across the interior roof line.

The framers completed the interior entry arch leading into the Great Room from the front entrance. This will be layered with the same stone as the exterior with round columns on the sides.


Moving further into the house, the builder installed the in-wall vacuum system that will support our ability to chase dust bunnies from room to room. (This thing will suck a marble from one end of the house to the other.)


The framers also completed the bathtub platform for Jan's bathtub (notice I said 'Jan's'). When the tub is delivered, they will cut an appropriate hole in the top, lower the tub in, and then sheetrock, granite and tile the surrounding platform.


We met John the Resin Guy this week as he was applying the fiberglass base coats to each of the shower floors in the house. This was a four layer process that he eventually filled with water later in the week to test for any leaks. (We closed all of the windows, inhaled, and had a great time reminiscing about our surfboard building with the same stuff back-in-the-day.) No leaks!
Moving to the detached second garage, the framers were able to complete the 'casita' (apartment) framing to allow the plumbers and electricians to begin their work.
Framed kitchen, bath and closet areas.
As you can see from the following exterior pics, the house was completely zip-taped just before we left, and the roof tile pallets were delivered while we were gone (in between the thunderstorms).
22 pallets of roof tiles.
The roofers then went to work applying the second layer of roofing paper and felt (remember 'ice and water armor'?), and began laying the 'nailers' to the roof that will hold the tiles in place during installation.
This is the time that they also apply all of the roof 'crickets' (builder-speak for metal that is specially welded to contour the water off of the roof in a specific direction), and the metal flashing in the corners and around pipes poking through the roof. We have what the roofers have referred to as the "Roof from Hell" because of all of the gables and hips, not to mention the turret roof. (Blame the architect.)
Cricket at the base of the powder room turret. Not finished.

Since we have never built a home with Spanish roof tiles, we learned that the roof tiles needed to be stacked on the roof before the stucco mud is applied to the exterior walls. This allows the roof weight to settle the walls, and eliminates any stucco cracking. (See how educational this is!)


The cornice team returned to finish assembling the tongue-and-groove soffits and patio roof. (Jan doesn't think we see her.)


This then allowed the painters to come in and begin the caulking process for the fascia before it is painted.


Early last week the stucco team arrived and began assembling the scaffolding for the stucco application. A portion of the house will have stucco accents, and will take about 2-3 weeks to complete. They were able to install the 15-pound roofing felt on the walls, and 15-gauge metal netting all around the areas that will have stucco treatment (it still looks like chicken wire to us). The remaining 'green' walls will have stone per the previous blog post. 
Upper Great Room exterior wall.
Motor Court archway.
Detached Garage rear wall.
They also installed the forms for the window 'eyebrows and chin' (don't ask, because I have no idea how this description evolved) on the windows in the stucco areas, and on a few of the arches in the patio area. They do look kinda cool.


Jan and Regina (designer) going over stone, stucco, and tile color selection.
A cool picture just before a Texas thunderstorm yesterday.
Late Breaking News...
As we visited the site this morning before sending off this blog installment, the stucco team began putting up a 'scratch coat of mud' (builder-speak for the first stucco layer), and the fireplace team began installing the indoor and outdoor fire block for the gas and wood burning fire places. (More on the next blog update.) 
First coat of stucco on the motor court arch. 
Moving at the speed of mud.
Mexican stucco comedy team.
Inside fireplace fire-block pieces waiting for mortar. 
Patio fireplace waiting for installation.
Cutting flue and vent holes in the chimney.
But wait, there's more...
Jan and I spent last week in So. Calif. at our niece's wedding. It was a beautiful wedding, but what made it doubly great was that all of my father's east coast brothers and sisters, and our cousins, were able to attend (minus the two brothers living in Greece). It was a truly memorable family reunion with a lot of laughs, partying, and a happy time together for the 'elders'. (Unfortunately, I left out about 200 additional pictures which I'm sure everyone is dying to see.)
Warning! - Lots of family pictures below!
 The aunts and uncles - Vera, Helen, George (92), Harry (94), Dad (95)
(No ages for the ladies.)
Our crazy and wonderful cousins. Hotties!
Niece and Goddaughter
Marianna and
Dan
Little Sis Carol and Daughter
Lisa


Hottie Aunt Ephrosini with Jan trolling at the beach.
Just us.
That's all for today.
See ya later.
- John and Jan -